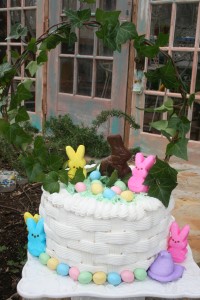
Basket Cakes are a fun mix of delicious cake and colorful centerpiece. The top of the cake can be “filled” with chocolate bunnies and Easter candies, or fresh flowers. The cake shown here is a 10-inch round, baked in two Wilton cake pans that measure 1 ½ inches high. Each pan holds one whole cake recipe or one whole cake mix. This gives a nice, high cake so the basket weave has room to show and the cake doesn’t look “squatty.” Basket weave can also be done on a square cake.
Remember that your basket weave doesn’t need to be perfect. We’re after a hand-made, artistic look – not a plastic, machine-made look. Your basket cake is an expression of your love and joy and your family and friends will get a kick out of it even if it’s lopsided or the weaving isn’t connected. Besides, you can always say you are “just learning!”
Here are the instructions.
Bake a two-layer cake. Level the top of each layer by using a long serrated knife to cut off the rounded top of the layers. This will give your finished cake a neat, flat top.
Frost the top of one layer and top with the second layer. Frost the cake completely. This layer of frosting doesn’t need to be thick or perfect. The weaving will cover this layer.
You’ll need a pastry bag and a basket weave tip. I like to use a 10” or 12” bag. The basket weave tip comes in several sizes. One is Wilton’s #45. This tip fits inside a standard coupler. I like to use the Wilton #2B, which is much wider. It is too large for a coupler, so I place it directly into the bag without using a coupler.
Fill the pastry bag with frosting and follow the illustration at the right.
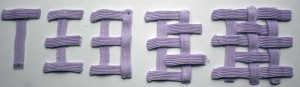
Starting at the top of the cake, make one vertical line (keep the serrated side of the tip facing up) down the side of the cake. Then pipe several horizontal lines across the vertical line (extending about 1 inch past the vertical line), leaving space between each line the same width as the tip you are using.
Pipe a second vertical line, just covering the ends of the horizontal lines. Again, pipe horizontal lines, crossing over the vertical line and extending about 1 inch past it. This is the beginning of the basket weave look.
Continue the vertical and horizontal lines around the sides of the cake. When you get completely around the cake, it may not finish up evenly to make the one last proper weave. Don’t worry about this. You can cover up this imperfection with ivy leaves – it will be the back or side of your cake. Here is a photo of the back of my cake where it didn’t end up evenly. It’s disguised with ivy.
If there are other uneven line connections around the cake, you can cover them with ivy leaves, flowers, or candy – if you desire. But remember that this is a hand-crafted basket.
Use a wire hanger to make a handle. Cut off the hook and bend the remaining wire into a handle shape. Cover with florist tape (available at craft stores). Cover the handle with long pieces of fresh ivy or other non-poisonous vines. If you use something that can’t be wound around the wire, you can use florist wire to wire it in place.