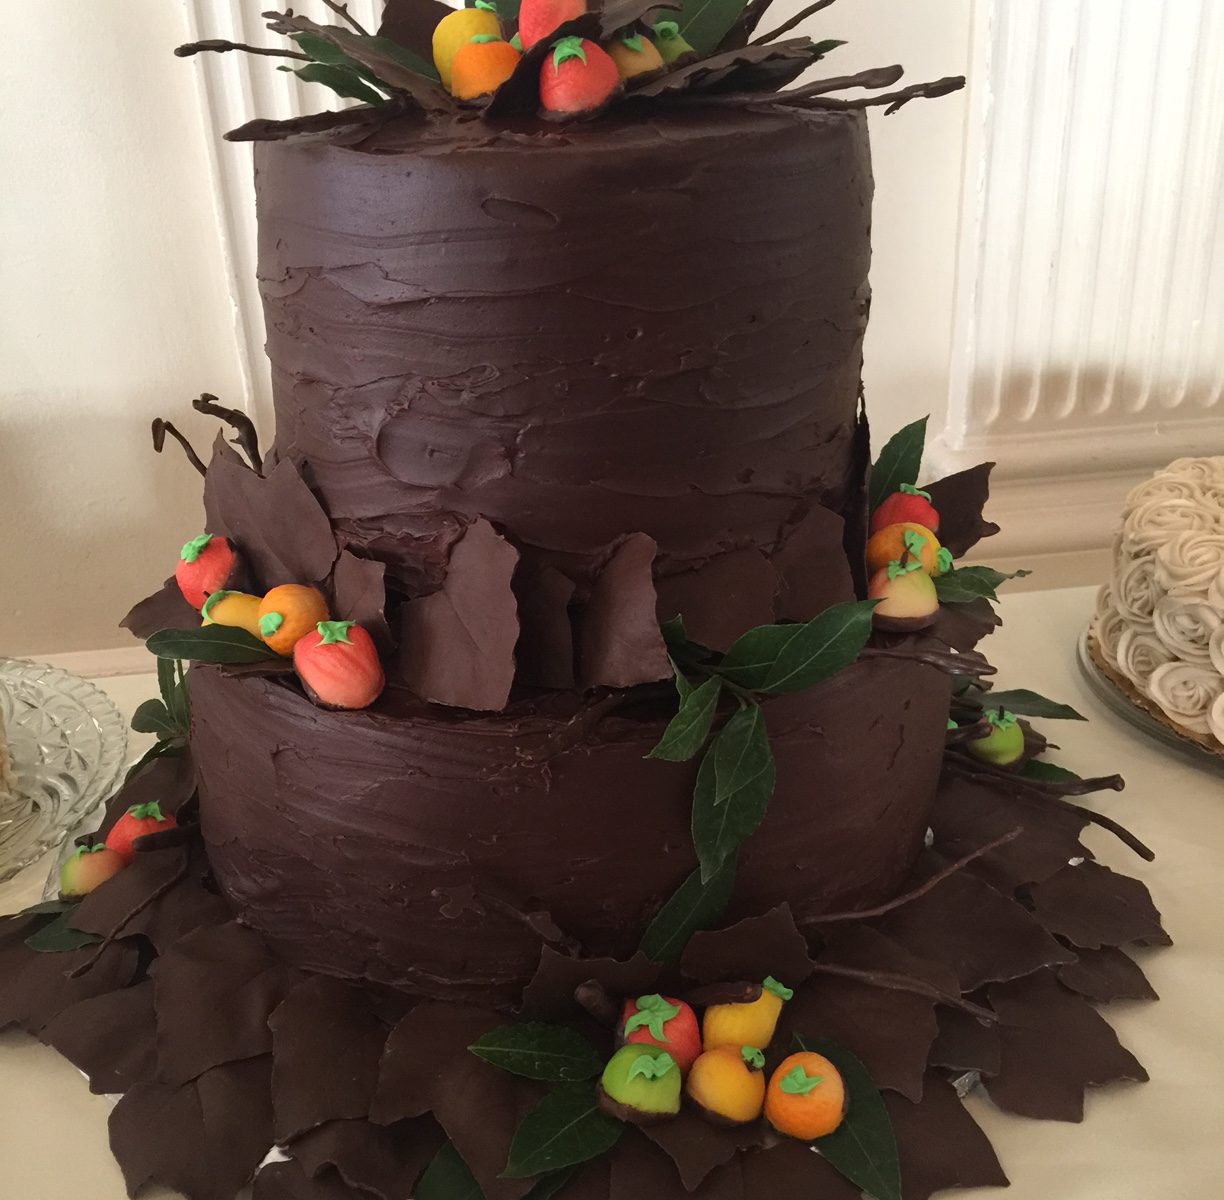
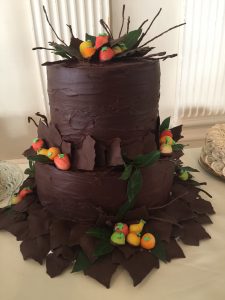
Chocolate Ganache


Chocolate Ganache

It’s easy to make any cake look totally “Hollywood,” when you frost it with Chocolate Ganache. It doesn’t have to be a three-tired Groom’s cake. It can be a single-layer cake you just whipped up. Or even cupcakes.

My recipe is simple … just two ingredients; heavy cream and semi-sweet chocolate. My recipe calls for 2 pounds of each, but you can use any amounts. The formula is equal parts heavy cream and chocolate.

I usually make more than I think I will need, and freeze the extra. It’s very convenient to have ganache on hand for last-minute desserts. Heat to a liquid and drizzle over pudding, ice cream, or just about any dessert.

Chocolate Ganache

Yield: enough to fill and frost 2-layer, 9-inch cake

2 pounds quality chocolate, chopped or 2 pounds chocolate chips

2 pounds heavy cream

  1. In a heavy saucepan, heat chocolate and heavy cream until chocolate is melted. Beat with a wire whisk for at least 1 minute to insure every bit of chocolate is melted and incorporated into the cream. If there are bits of chocolate left, the ganache will be lumpy.
  2. Cool to room temperature. Ganache is now ready to be used as frosting.

Tips: Use a kitchen scale to measure the chocolate and the heavy cream. Chocolate recommended: Ghirardelli chocolate chips.
If finished ganache is not thick enough, place bowl of ganache over second bowl of ice and beat with a metal spatula until thickened.


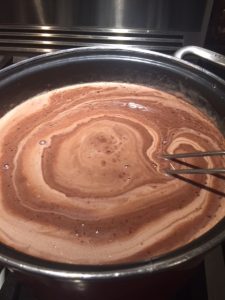
When first melting the chocolate into the heavy cream, it will look swirly. Keep stirring.

When the mixture looks completely mixed, I whisk for about 1 minute to make sure all lumps of chocolate are melted.

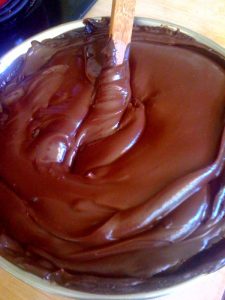
Beautiful! When the mixture comes to room temperature, it will have the consistency of frosting. If it is a little thin, place over a bowl of ice and beat a few minutes to help the ganache set up.


Glazed Fresh Fruit Pie

Glazed Fresh Fruit Pie

Yield: 1, 9-inch pie to serve 6

For this pie, I used blackberries from Bill’s garden, raspberries, golden kiwi, blueberries, grapes, and oranges.


2 cups water

2 cups sugar

1/3 cup cornstarch

1, 3-ounce package dry peach gelatin

2 quarts summer fruit, stemmed, washed and dried

1, baked pie crust (9-inch, deep-dish)


Place water, sugar, and cornstarch in a saucepan and whisk to combine. Place over medium-high heat and bring to a boil, whisking often. Lower heat; whisk and simmer for 1 minute. Remove from heat and whisk in gelatin. (If there are any lumps of cornstarch, pour mixture through a fine sieve.) Cool mixture until just warm. (If I’m in a hurry, I place the pan over a bowl of ice and whisk.)

Place a layer of fruit into the baked pie crust. Spoon cooled gelatin mixture over the fruit. Add remaining fruit, adjusting pieces to make a pretty dome. Top with as much remaining gelatin mixture as needed for a generous glaze. I end up using about ¾ of the glaze. Refrigerate at least an hour, but DON’T cover with plastic wrap – it will stick to the glaze.

Strawberry Pie

Fresh Strawberry Pie

Yield: 1, 9-inch pie to serve 6

2 cups water

2 cups sugar

1/3 cup cornstarch

1, 3-ounce package dry strawberry gelatin

2 quarts whole strawberries, stemmed, washed and dried

1, baked pie crust (9-inch, deep-dish)


Place water, sugar, and cornstarch in a saucepan and whisk to combine. Place over medium-high heat and bring to a boil, whisking often. Lower heat; whisk and simmer for 1 minute. Remove from heat and whisk in gelatin. (If there are any lumps of cornstarch, pour mixture through a fine sieve.) Cool mixture. (If I’m in a hurry, I place the pan over a bowl of ice and whisk until cool.)


Place a layer of strawberries into the baked pie crust. Spoon cooled gelatin mixture over the berries. Add remaining strawberries. To make a smooth dome, cut a few berries in half and stack on the sides. Top with as much remaining gelatin mixture as needed for a generous glaze. Refrigerate at least an hour, but DON’T cover with plastic wrap – it will stick to the glaze.


Seven-Minute Icing

seven minute icing on cake photo 2

Seven-Minute Icing

Yield: Frosting for two- or three-layer cake with lots of fluff on top

4 egg whites (1/2 cup)

3 cups white sugar

1/2 teaspoon cream of tartar

pinch of salt

2/3 cup water

2 teaspoons vanilla

Whisk together egg whites, sugar, cream of tartar, salt, and water in the top of a double boiler. (If you don’t have a double boiler, use a stainless steel bowl placed on top of a saucepan of simmering water.) Before placing egg white mixture over simmering water, use an electric mixer (a hand-held mixer is essential here) beat on high speed 1 – 1 1/2 minutes.

Place over simmering water (don’t let the water touch the bottom of pan with egg white mixture). Beat on high speed for 7 minutes, while water simmers. This will cook the egg whites and thicken the icing.

Remove pan from heat and add vanilla. Beat 2 more minutes on high speed (off the simmering water). This will thicken and cool icing.

Use an 8-inch metal, offset spatula to fill and thickly frost cake. Pile remaining frosting on top of cake.  Yes! All of it!

Log Cake (Bûche de Nőel)

Log cake 2

Log Cake (Bûche de Nőel)

Yield: serves up to 15 guests

Children will love decorating this festive log cake. It’s sure to become a cherished tradition in your home.

4 whole eggs

1 cup sour cream

1/2 cup vegetable oil

1/2 cup water or coffee

1 small package instant chocolate pudding mix

1 boxed chocolate cake mix

2 ounces semi-sweet chocolate, melted

1 recipe Chocolate Frosting (recipe follows)

Candies or rolled fondant (available at craft stores) for decorating

Powdered sugar

1. Preheat oven to 350°. Grease and flour 3, 1-pound coffee cans.

2. In a mixer bowl, beat together eggs, sour cream, vegetable oil, and water. Add pudding mix and cake mix and beat 1 minute, scraping the bowl as needed. With mixer running, slowly pour in melted chocolate; beat 1 minute longer.

3. Divide batter evenly between prepared pans and bake 45 minutes or until a toothpick comes out clean from the center.

4. Let cakes cool 30 minutes in the pans. To loosen cakes from cans, run a long thin knife between the cake and the can. Then carefully dump out the cakes. Cool cakes completely before decorating.

5. Place two of the cakes together on a platter, “glueing” the ends together with a little frosting to form a log. Cut remaining cake in half diagonally. Use frosting to “glue” each half to the sides of the log. Frost the entire cake, including the round ends. Use the tines of a fork to make bark-like markings on the sides and ends of the cake, giving it the look of a wooden log. Decorate with candies or fondant and dust with powdered sugar.


Apple Dumplings with Cinnamon Sauce

Apple Dumplings with Cinnamon Sauce

Yield: 6 servings

Golden, syrupy crust covers tender, cinnamony apples. More comfort food!

Filling

6 tablespoons butter, softened

2 cups white or brown sugar, divided use

½ cup chopped pecans

½ cup raisins

3 tablespoons cinnamon, divided use

Pie Crust

2 1/2 cups flour

1 teaspoon salt

1 cup butter, chilled

6 tablespoons ice water

Apples:

6 medium baking apples, cored but not peeled

1 egg beaten with 1 tablespoon water to form an egg glaze

½ cup water

Directions

  1. Spray 2-quart baking dish with nonstick coating. In mixing bowl, stir together butter, 1 cup of the sugar, pecans, raisins and 2 tablespoons of the cinnamon. Set aside.
  2. Make pastry: Whisk flour and salt together in a medium bowl. Use a pastry blender to cut in butter until mixture resembles coarse crumbs. Sprinkle 2 to 3 tablespoons water over mixture, toss with a fork to moisten, adding more water, a few drops at a time, until dough comes together. Gather dough together and press into a flat disk. Wrap in plastic wrap and chill at least 30 minutes.*
  3. Preheat oven to 375ºF. Divide dough into 6 pieces. Roll out one piece, large enough to cover one apple. Place apple in center of pastry and fill center of apple with one-sixth of the butter-sugar mixture. Fold up pastry to cover apple and pinch edges together to seal. Repeat with remaining pastry, apples and sugar mixture. Place apples in prepared baking dish and brush with egg glaze. Bake 25 to 30 minutes or until golden brown.
  4. While apples bake, make the sauce: Place remaining 1 cup sugar, remaining 1 tablespoon cinnamon and the ½ cup water in a small saucepan. Bring to a boil and simmer 5 minutes. Pour sauce over baked apples just before serving.

*Freeze ahead: Form apple dumplings and place in baking dish. Wrap with 2 layers plastic wrap and one layer foil. Freeze up to 1 month. Defrost, preheat oven to 350°F. Bake as above and continue with step #3. 

Bread Pudding

317266582a889ef789257c038c572541c1437a51Bread Pudding

Yield: 6 servings

8 cups stale French bread, broken into small pieces

2 cups milk

1 1/2 cups sugar

1 teaspoon cinnamon

5 tablespoons butter, melted

3 eggs

1 tablespoon vanilla

1/2 cup raisins

1/2 cup chopped pecans

1/2 cup shredded coconut

1. Preheat oven to 350º. Spray a 2-quart baking dish with vegetable oil.

2. Place bread in a large bowl and pour milk over it. Stir several minutes until all bread is soaked. Add remaining ingredients and mix well.

3. Pour into prepared baking dish and bake 1 hour or until middle is set and top is golden brown. Serve with Butter Sauce.

Butter Sauce:

1/4 cup butter

3/4 cup powdered sugar, sifted

1 egg yolk

1/4 cup cream

1. Melt butter in a saucepan over medium heat. Add sugar and whisk until all butter is absorbed; remove from heat. Beat egg yolk into cream. Whisk egg yolk mixture into butter mixture, beating until smooth.

2. Heat and stir over low heat until hot. Pour over individual servings of warm bread pudding.

Basket Weave Cake

Basket Weave Cake
Basket Weave Cake

Basket Cakes are a fun mix of delicious cake and colorful centerpiece. The top of the cake can be “filled” with chocolate bunnies and Easter candies, or fresh flowers. The cake shown here is a 10-inch round, baked in two Wilton cake pans that measure 1 ½ inches high. Each pan holds one whole cake recipe or one whole cake mix.  This gives a nice, high cake so the basket weave has room to show and the cake doesn’t look “squatty.” Basket weave can also be done on a square cake.

Remember that your basket weave doesn’t need to be perfect. We’re after a hand-made, artistic look – not a plastic, machine-made look. Your basket cake is an expression of your love and joy and your family and friends will get a kick out of it even if it’s lopsided or the weaving isn’t connected. Besides, you can always say you are “just learning!”

Here are the instructions.

Bake a two-layer cake. Level the top of each layer by using a long serrated knife to cut off the rounded top of the layers. This will give your finished cake a neat, flat top.

Frost the top of one layer and top with the second layer. Frost the cake completely. This layer of frosting doesn’t need to be thick or perfect. The weaving will cover this layer.

You’ll need a pastry bag and a basket weave tip. I like to use a 10” or 12” bag. The basket weave tip comes in several sizes. One is Wilton’s #45. This tip fits inside a standard coupler. I like to use the Wilton #2B, which is much wider. It is too large for a coupler, so I place it directly into the bag without using a coupler.

Fill the pastry bag with frosting and follow the illustration at the right.

 Closeup of basket weave technique
Closeup of basket weave technique

Starting at the top of the cake, make one vertical line (keep the serrated side of the tip facing up) down the side of the cake. Then pipe several horizontal lines across the vertical line (extending about 1 inch past the vertical line), leaving space between each line the same width as the tip you are using.

Pipe a second vertical line, just covering the ends of the horizontal lines. Again, pipe horizontal lines, crossing over the vertical line and extending about 1 inch past it. This is the beginning of the basket weave look.

Continue the vertical and horizontal lines around the sides of the cake. When you get completely around the cake, it may not finish up evenly to make the one last proper weave. Don’t worry about this. You can cover up this imperfection with ivy leaves – it will be the back or side of your cake. Here is a photo of the back of my cake where it didn’t end up evenly. It’s disguised with ivy.

If there are other uneven line connections around the cake, you can cover them with ivy leaves, flowers, or candy – if you desire. But remember that this is a hand-crafted basket.

Use a wire hanger to make a handle. Cut off the hook and bend the remaining wire into a handle shape. Cover with florist tape (available at craft stores). Cover the handle with long pieces of fresh ivy or other non-poisonous vines. If you use something that can’t be wound around the wire, you can use florist wire to wire it in place.


Chocolate Chip Cookies

choc chips

Chocolate Chip Cookies

Yield: 8 dozen cookies

1 cup butter

1 cup vegetable shortening (Crisco)

1 1/2 cups white sugar

1 1/2 cups brown sugar

1 tablespoon vanilla

4 eggs

4 1/2 cups flour

2 teaspoons baking soda

2 teaspoons salt

2, 12-ounce packages chocolate chips


1. Preheat oven to 350º. Spray cookie sheets with non-stick coating.

2. In a mixing bowl, beat together butter, shortening, white and brown sugars and vanilla, until light and fluffy. Beat in eggs.  Stir together flour, baking soda and salt. Add to the creamed mixture and beat well. Stir in chocolate chips. Drop by spoonfuls (about 1-inch wide plops) onto prepared baking sheets. Bake 8 to 10 minutes, or until lightly browned.