Huevos Rancheros

Cook this fabulous dish over coals, on the grill, or stovetop. Use a large skillet, or in this case my paella pan.

Huevos Rancheros

Huevos Rancheros
Yield: 7-8 servings

2 tablespoons vegetable oil
1/2 cup chopped onions
3 cloves garlic, chopped
4 large tomatoes, diced
3 roasted poblano chiles, peeled, seeded, and diced
1 chipotle chile, chopped (optional)
1 tablespoon chili powder
½ teaspoon cumin
Chicken stock as needed
7 – 8 eggs
Salt and pepper to taste
8 crispy corn tortillas
1 cup shredded cheddar cheese
1 – 1 ½ cups prepared pico de gallo
1/2 cup chopped cilantro

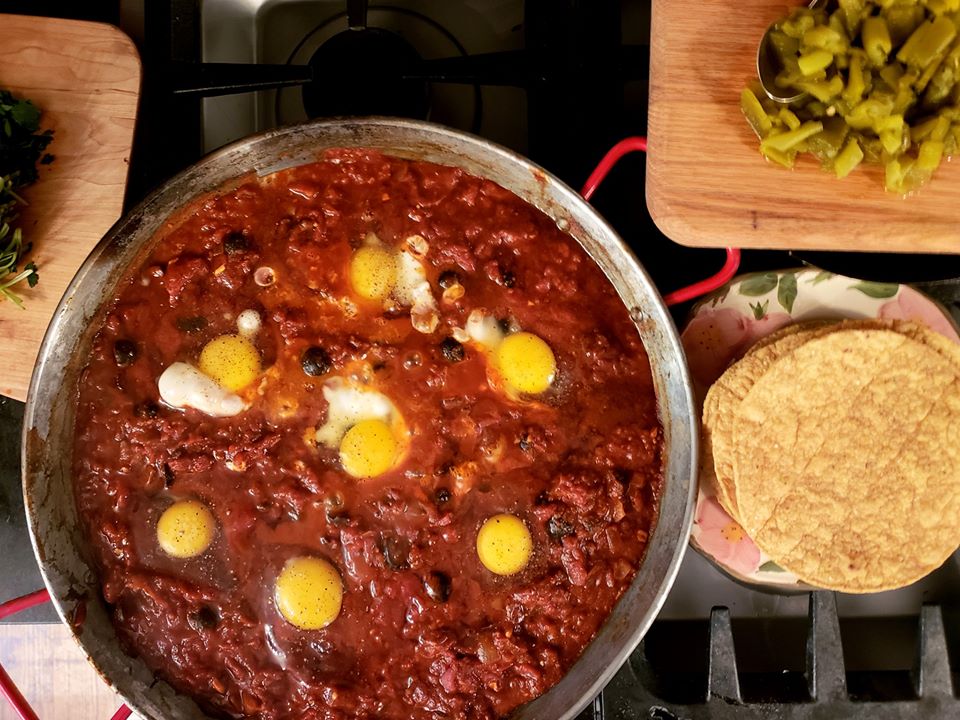
  1. Heat oil in skillet and add onions and garlic; cook and stir 3 – 5 minutes until soft. Add tomatoes, poblano, chipotle, chili powder, and cumin. Mix well and cook until tomatoes start to break down and become a salsa-like consistency. If salsa becomes too thick, stir in a little chicken stock. Break eggs on top of salsa; cover skillet and cook 10 – 12 minutes, until eggs are done to your preference. Season with salt and pepper.
  2. To serve, spoon a cooked egg, along with some of the salsa, on crispy tortilla. Top with cheese, pico, and cilantro.

Caramelized Pearl Onions from Trish Gomez

Every year I seem to discover a “break-out” recipe. This is definitely a winner for this year. Thanks to my wonderful, lovely friend, Trish, for sharing this dish with me. It sparked lots of chatter on FB, and she is gracious to let me post it here.

All my family went crazy over it at Thanksgiving. Wanted to just roll around in it! It is a beautiful dish and I served it in my cute iron skillet to add even more visual appeal.

I can imagine that it will go fabulously well with grilled steaks. Sweet Bill spooned it on top of his mashed potatoes. My dear gluten-free girl also spooned the sauce on her potatoes and I think on her cornbread dressing.

So I’m thrilled to get to share Trish’s recipe with you. Enjoy and let me know how you serve it.

Yield: 6 – 8 servings

Judie’s note are in parentheses.

2 pounds pearl onions or boiler onions (I used boiler onions)

1 stick butter

1 tablespoon brown sugar

1/2 teaspoon ground nutmeg (I used 2 teaspoons dried thyme instead of nutmeg)

1 teaspoon salt or to taste

1/2 teaspoon pepper or to taste

3 cups heavy cream

  1. Peel onions: Bring a saucepan of water to a rolling boil and add onions. Simmer 1 minute, then remove onions with a slotted spoon to a bowl of ice water. Use a paring knife to cut the root end off each onion, then pinch each one at the stem to slip it off. You can use a paring knife to remove the skin if it doesn’t slip off easily. Note: if you use frozen pearl onions, you can skip this step since they are already peeled.
  2. Melt butter in a skillet and when hot, add onions. (I did this in two batches to keep the onions in one layer.) Slowly cook until onions are becoming golden brown. Stir gently only when they are ready to turn. You don’t want the onions to completely fall apart.
  3. Add brown sugar, nutmeg (thyme), salt and pepper. Continue to cook onions until very golden and caramelized. (At this point I added about 2 tablespoons brandy and cooked it down a few minutes. This is not necessary.)
  4. Add heavy cream to the level of the onions. (I used extra cream since we like lots of sauce.*) Cook slowly until sauce is thickened and nice and creamy brown. Taste and add salt and pepper if needed.

*The amount of cream you use doesn’t need to be exact.

Strawberry Pie

Fresh Strawberry Pie

Yield: 1, 9-inch pie to serve 6

2 cups water

2 cups sugar

1/3 cup cornstarch

1, 3-ounce package dry strawberry gelatin

2 quarts whole strawberries, stemmed, washed and dried

1, baked pie crust (9-inch, deep-dish)


Place water, sugar, and cornstarch in a saucepan and whisk to combine. Place over medium-high heat and bring to a boil, whisking often. Lower heat; whisk and simmer for 1 minute. Remove from heat and whisk in gelatin. (If there are any lumps of cornstarch, pour mixture through a fine sieve.) Cool mixture. (If I’m in a hurry, I place the pan over a bowl of ice and whisk until cool.)


Place a layer of strawberries into the baked pie crust. Spoon cooled gelatin mixture over the berries. Add remaining strawberries. To make a smooth dome, cut a few berries in half and stack on the sides. Top with as much remaining gelatin mixture as needed for a generous glaze. Refrigerate at least an hour, but DON’T cover with plastic wrap – it will stick to the glaze.


Salade Nicoise

Make this beautiful, yet simple salad for your family and friends. It’s so easy (uses canned tuna), healthful, and so interesting, it can also be your centerpiece. You don’t have to stick with this exact recipe – add any vegetables you like to eat raw with salad dressing, such as zucchini, asparagus, celery, or carrots.

Herb Dressing:
¼ cup fresh lemon juice (about 2 lemons)
1 teaspoon dried mixed French or Italian herbs
1 teaspoon salt or to taste
½ teaspoon pepper
1 tablespoon Dijon mustard
1/3 cup olive oil
Salad:
1 ½ pounds new potatoes, boiled until tender
1 pound Roma tomatoes, quartered
½ pound fresh green beans, blanched
4 – 6 scallions, sliced
1 can whole beets, drained
1 cucumber, lightly peeled and thinly sliced
1 bell pepper, chopped or sliced
½ cup pitted Nicoise olives (or other black olives)
4 – 6 hard-cooked eggs, halved
3 – 4, 4-ounce cans oil-packed tuna, drained

  1. In a medium bowl, whisk together lemon juice, herbs, salt, pepper, and mustard. Continue to whisk while slowly pouring in the olive oil. Store in refrigerator until time to serve salad or up to 3 weeks.
  2. Arrange all salad ingredients on a large platter. Just before serving, drizzle on Dressing. Serve extra Herb Dressing on the side.

Judie’s Streuseled Sweet Potatoes

Streuseled Sweet Potatoes
Yield: 6 – 8 servings

4 medium sweet potatoes, baked until very soft and peeled
1 1/2 cups sugar
1 cup evaporated milk
2 eggs
6 tablespoons butter
1 teaspoon cinnamon
1/2 teaspoon cloves

Preheat oven to 350º. Butter 9 x 12-inch baking dish.

Use a mixer to blend all ingredients and pour into prepared baking dish. Bake 30 – 40 minutes. Top with Streusel and bake another 15 – 20 minutes.

Top with Streusel (recipe below).

Streusel:
6 tablespoons butter, melted
3/4 cup panko crumbs
1/2 cup brown sugar
1/2 cup chopped pecans

Stir together with a fork until crumbly.

Fig Preserves!

FWCJuly2151fnl

Whether it’s fig season or not, you can make these delicious fig and cheese open-faced sandwiches – actually bruschetta. If you don’t have your own home-made fig preserves, you can find jars at the grocery store. These flavors are a perfect marriage of tangy and sweet – one of my favorite combos. You have the sharp blue cheese, then the sweet preserves – oh yum! And it’s all filled in with mild chicken chunks, making it quite hearty. (Sometimes I leave off the chicken and just have the cheese, preserves, and some type of green on top which could also be chopped fresh rosemary.)

Open-Faced Chicken, Fig, and Blue Cheese Melts

Yield: 2 servings

4 slices country sour dough bread, lightly toasted

4 tablespoons interesting mustard (I used McCutcheon’s Vidalia Onion Mustard from Central Market)

8 ounces sliced cooked chicken

4 tablespoons fig preserves

4 – 6 tablespoons crumbled blue cheese

½ cup dandelion greens or arugula

  1. 1. Place toasted bread on baking sheet and spread each piece with mustard. Layer with chicken, dollops of fig preserves, and blue cheese.
  2. 2. Broil 2 – 3 minutes or until blue cheese begins to melt. Top with greens and serve immediately.

Spring Cooking Classes!

Join Judie to learn fresh new recipes and meals that will add joy and great memories to your spring and summer.

You will be welcomed with wine (or tea) and hors d’oeuvres. Then sit in Judie’s new kitchen to learn tips and tricks to make you a star in your own home. The first lesson will be a bonus recipe – one of Judie’s favorite “grocery bag to dinner table” dishes. Then a complete dinner including salad and dessert. You will learn many techniques from these recipes that will help you cook myriad recipes with confidence and ease.

Whether a beginner or a seasoned cook, you are sure to leave inspired and encouraged to create beautiful, fabulous dishes for your family and friends. The class includes all recipes. Come hungry! We will feast on all the dishes we prepare.

Monday, March 24 (waiting list only for this class), 10:00 AM – 1:00 PM

OR

Tuesday, March 25, 6:30 – 9:30 PM

OR

Wednesday, March 26, 6:30 – 9:30 PM

Cost: $45.00. Send check to Judie Byrd @ The Culinary School of Ftw. 6100 Camp Bowie, 76116.

INCLUDE PHONE NUMBER and E-MAIL. Your check is your reservation and upon receiving your check, we will give you further details via e-mail or phone.


Judie’s Holiday Classes!

cropped j rolling dough

Opening Additional Classes!

Judie’s holiday classes have filled so we are opening two new dates:

Wednesday, November 20, 6:30 – 9 PM

OR

Friday, November 22, 10 AM – 12:30 PM

Kick off the season with Judie’s exciting, festive, cozy classes where you will meet friends, sip mulled cider (recipe included), and sit at pretty tables to learn fabulous holiday cuisine.

 “I can’t wait to teach you my new best holiday recipes!” -Judie

Holiday Food and Entertaining 

with Judie and Fort Worth, Texas Magazine

Join this fun, festive class where Judie will show you fabulous recipes that you can cook up to delight and impress family and friends.

You’ll learn TWO stunning meats: Glazed Turkey with the best Sage Dressing ever, and an elegant Carved Roast with Yorkshire Pudding. We’ll teach you all the best sides including an elegant soup, homemade yeast rolls, a spectacular dessert, and more.

As usual, Judie’s class is packed full of tips and tricks to make cooking in your kitchen quicker, easier – and actually enjoyable!

You’ll want to make our snazzy Velvet Pumpkins for your centerpiece and to give as gifts – all instructions included. (Pictured below)

The class will begin with hors d’oeuvres and end with a full meal – so come hungry! With Judie’s holiday class, you’ll be ready for the season . . . and so inspired, you’ll wish it could last all year!

Dates:

Wednesday, November 13, 6:30 – 9 PM

OR

Friday, November 15, 10 AM – 12:30 PM

Location:

The Culinary School of Fort Worth

6100 Camp Bowie Blvd. (above La Madeleine Restaurant)

Fort Worth, Texas 76116

$55.00 each, if you are a subscriber to Ft.Worth, TX Magazine

$60.00 each, non subscribers

To register, call 817.737.8427 

Velvet Pumpkins

velvet pumpkins 195187_475145829184511_701849002_o

Fig Preserves

This batch is made from whole figs. Beautiful and jewel-like when they cook down and get transparent.

My faithful fig tree is giving us a bountiful crop this year. Which means my faithful stove is cooking away, producing jar after jar of beautiful preserves. A jar of this golden goodness offers endless possibilities for good eating. Serve it over goat cheese with a sprinkle of freshly chopped rosemary. Sure, it’s suppose to be spread of crackers, but often my guests just want to eat it with a fork. Homemade biscuits become ethereal when filled with a spoonful, and chicken or turkey sandwiches are over-the-top with a thick layer smeared on the bread.

And making them is so rewarding – you start out with a plain, soft fruit. You end up with what my dad would have called, “nectar of the gods.” Here’s my recipe:

Fig Preserves

Yield: about 10 cups preserves

8 cups chopped figs

8 cups sugar

½ cup water or fresh lemon juice

half a lemon, thinly sliced

  1. Place figs, sugar, water, and lemon slices in a Dutch oven or other large pot and stir to combine. Place over medium heat and cook carefully until mixture begins to simmer, stirring every so often. Turn heat to low and cook, stirring very often, until figs are translucent, and syrup is thick. This will take 2 – 6 hours.* As mixture thickens, be sure to stir and scrape down the sides of the pan often to keep mixture from settling to the bottom and burning.
  2. Fill hot, sterilized jars with boiling figs and syrup to within ½ inch of the top. Wipe sealing edge clean and put on lids and rings. Tighten rings just to “finger tight” or just to snug. Process in boiling water bath for 12 minutes.

*I like to cook my fig preserves until they are very thick, up to 6 hours. You might like yours thinner. Sometimes I pick the figs, cut them up, and start the cooking process – maybe an hour or more of cooking. Then if I get busy, I take them off the fire, cover the pot, and just leave it on the counter overnight. The next morning I continue the cooking process, until they are really good and thick.

I also like to make some of my preserves “caramelized.” For this, I simply cook the fig mixture until it is dark and almost gooey. Just be very careful not to burn them – keep the fire very low and stir often.


There's something very satisfying about a stack of just-put-up jars of Fig Preserves...
There’s something very satisfying about a stack of just-put-up jars of Fig Preserves…

Chocolate Bowls with Taylor and Her Friends

Watch my granddaughter and her two adorable friends make Chocolate Bowls. This is part of Fort Worth, Texas Magazine’s monthly TV show, FYI Fort Worth. Seen at 9:30 P.M., the first Sunday of each month, on TXA channel 21. Here’s a tease of the show:

(FYI Preview) Chocolate Bowls with Judie ByrdTake a look at what Judie Byrd is whipping up this month! Catch the rest of this segment Sunday Feb. 3rd @ 9:30, on TXA 21.